Passive Fire
Record penetrations and systems, and certify the work.
Part of Quality & Safety.
Found in each project. What's the difference?
Hosts set it up and see everything; guests work on their own company's installations.
Passive Fire records the fire-stopped penetrations on the project. Each installation is a stamp on a drawing, recording the fire-stopping system used and its progress from planned to as-built. The tool exports the compliance report and handover pack.
An installation pairs two things from the library:

- Element: what the penetration goes through, such as a 200mm concrete slab. It records the material, the thickness, whether it's load bearing, and the rating it requires.
- Profile: a tested fire-stopping system, and the rating it achieves. It usually names a Product, such as a fire collar or a sealant.
When you stamp an installation, Teralo compares the profile's achieved rating with the element's required rating.
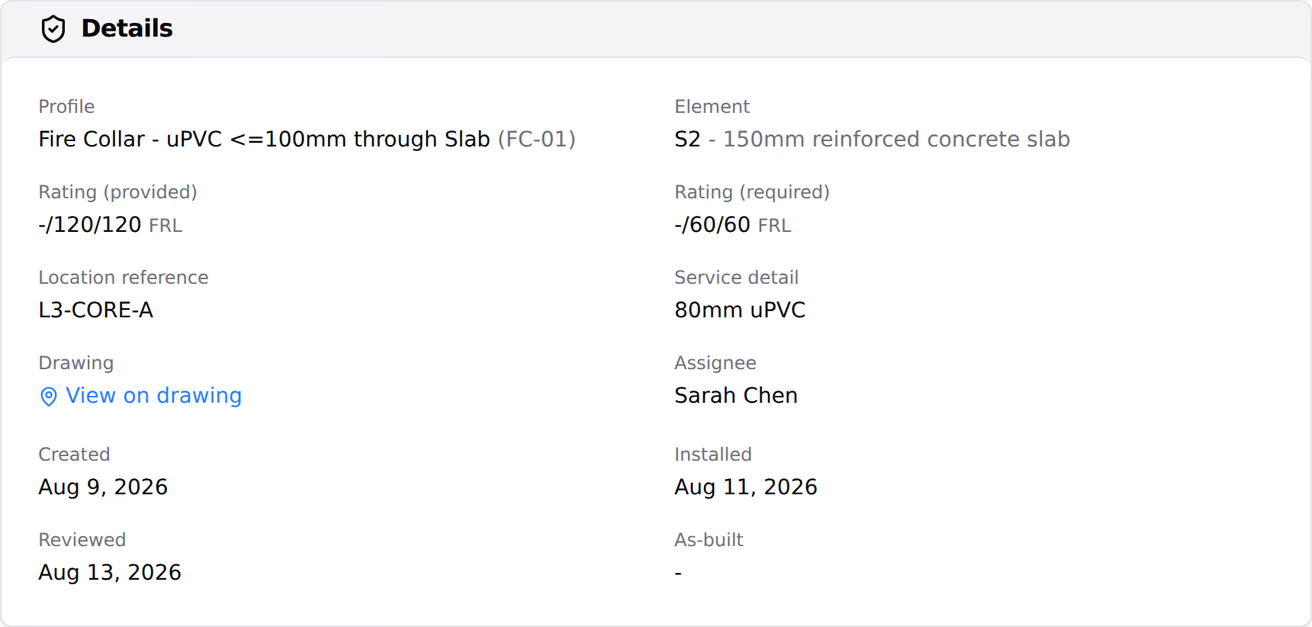
A rating is three numbers in minutes: structural adequacy, integrity and insulation. On an element, a blank number isn't required. On a profile, a blank number isn't rated.
Each element and profile records its rating standard:
- FRL: Australia.
- FRR: New Zealand.
- REI: Europe, under EN 13501-2.
- F/T: the United States, under ASTM E814, in hours.
- F/FT: Canada, under ULC-S115, in hours.
F/T and F/FT have no structural adequacy number.
When a profile's rating is lower than the element requires, or the two use standards that can't be compared, the stamp dialog shows a warning. To place the stamp, enter an Acknowledgement note. The note is kept on the installation, which shows Rating warning acknowledged.
FRL and FRR can be compared with each other. Any other pair of different standards can't.
Elements, products and profiles come from three places:
- The public database: kept by Teralo, and adopted into your organisation's library.
- Your organisation's library: in the organisation sidebar, under Organisation Settings, select Tools, then Passive Fire. The Passive Fire Library page has tabs for Products, Elements, Profiles, Documents and Workflows.
- Project additions: elements and profiles added on the project's Elements and Profiles tabs. They belong to the company that added them.
Guests stamp from their own company's library and their own project additions, never the host's library.
- On the Passive Fire Library page, select Browse Public Database.
- On each item you want, choose:
- Adopt: adds it to your library, and keeps it up to date with the public database.
- Copy: adds an editable copy, which no longer updates.
On the matching tab of the Passive Fire Library page, select New Product, New Element or New Profile, fill in the form, then select Create product, Create element or Create profile. On a project, the Elements and Profiles tabs have New Element and New Profile.
By default, a project can stamp every profile in the organisation's library. To narrow the list:
- On the project's Profiles tab, select Manage Whitelist.
- Move the profiles the project uses to Whitelisted.
- Select Save whitelist.
Project additions can always be stamped. To allow every profile again, select Clear all (allow every profile). Only host staff can change the whitelist.

Stamps go on drawings registered from the project's Documents.
- On the Drawings tab, select Register drawing.
- Choose a PDF from the project's documents.
- Optionally, enter a Label and choose a Location.
- Select Register.
You can register any project PDF your company can open. Guests see only the drawings their company registered.
- On the Drawings tab, open the drawing.
- Select the stamp icon (Stamp installation) on the drawing's toolbar, or press F.
- Select the point on the drawing.
- Choose the Element and the Profile.
- Optionally, enter the Location reference and Service detail.
- Select Place stamp.
After the first stamp, each click places another with the same element and profile. To change them, select Change on the bar that appears.
Each stamp creates one installation, numbered PF-1, PF-2 and so on, with the status Planned. The stamps stay on the document revision they were placed on; issuing a new revision of the drawing doesn't move them.
An installation moves through four statuses:
- Planned: stamped on the drawing.
- Installed: the work is done.
- Reviewed: the work has been checked.
- As-built: finalised for the handover record.
On an installation with no workflow, use the buttons on the installation: Mark installed, Mark reviewed and Mark as-built. With a workflow, select Complete on the Review installation and Finalise as-built steps.
To move several at once, select their stamps on the drawing, then the button to mark them installed, reviewed or as-built. On the register, select the installations, then Advance Status, choose the New Status, and select Update Status.
To move an installation back, select Revert to planned, or Send back - defect on a reviewed one. Both need a note.
Two checks can stop a move:
- Photos: the project can set a minimum number of photos before an installation is marked installed or as-built.
- Open defects: an installation can't be reviewed or marked as-built while a defect raised against it is open.
A bulk move skips any installation that fails a check.
On the installation, select Add Photo, then Take Photo or Upload from Device. Mark each photo as Install, Review or General.
- On the installation's Linked Observations card, select Raise defect.
- Fill in the observation and raise it.
A defect raised on a Reviewed installation moves it back to Installed. Learn more about observations.
To change an installation's Location reference or Service detail, select Edit, make the change, then select Save changes.
Warning: Deleted installations can't be restored from Teralo.
To delete one, open its three-dot menu on the register and select Delete, then confirm.
On the register, select the download icon, then choose an export:
- CSV and PDF: the register.
- Excel - Record schedule and Excel - Profile schedule.
- PDF - Key plans with records.
- PDF - Compliance report.
- PDF - Stickers / labels.
- ZIP - Handover pack.
Each export covers the installations the register is filtered to.
- Choose PDF - Compliance report or ZIP - Handover pack.
- Turn on Sign off (Statement of Compliance).
- Enter the Signer name and, optionally, the Title / role, Company, Certifier name, Certifier details and Statement wording.
- Sign in the Signature box.
- Select Generate PDF or Build ZIP.
Signing is for host staff with Can manage passive fire installations and tool settings. Teralo keeps a record of each sign-off and the installations it covered.
Host staff see every installation and drawing on the project. A guest sees their own company's installations, the drawings their company registered, and the installations whose workflow they take part in.
Guests can't change the settings or the whitelist, or sign an export.
The settings are on the project. In the project sidebar, under Project Settings, select Tools, then Passive Fire. The Settings tab holds:
- Rating standard: the standard new elements and profiles on the project start with.
- Before marking installed and Before marking as-built: the minimum number of photos, from 0 to 100. 0 means none are needed.
- Canned notes: notes offered as chips when commenting on an installation.
- Sticker title: the title printed on exported stickers.
Select Save settings to save them. The Workflows tab holds the workflow, described under Workflows below.
The organisation's library is set up on the Passive Fire Library page, described above.
| Permission | Allows |
|---|---|
| Can view passive fire installations | Seeing the register, drawings, elements and profiles, and exporting unsigned files |
| Can stamp and plan passive fire installations | Stamping, registering drawings, project additions, and editing your company's records |
| Can mark passive fire installations as installed | Marking your own company's installations installed |
| Can review passive fire installations | Reviewing, sending back and raising defects |
| Can manage passive fire installations and tool settings | Every status change, bulk changes, deleting, signing and the Settings tab |
Manage includes stamp and plan, and stamp and plan includes view. Install and review each include view.
The Settings tab, signing and the whitelist are for host staff only. Choosing the workflow needs Can manage project tools, which only host staff can hold. Learn more about how permissions work.
A workflow is optional. Without one, installations move with the buttons on each installation.
The default template is Passive fire lifecycle. It starts when an installation is marked installed, then runs a Review installation step for people with Can review passive fire installations, and a Finalise as-built step for people with Can manage passive fire installations and tool settings.
Organisations set up with the default tools have it bound already. To choose a different one, open the Workflows tab of the Passive Fire settings. On a project, Inherit organisation default uses the organisation's choice. Learn more about binding a workflow to a tool.