Estimating
Price a job from the drawings and keep the take-off with it.
Part of Contract Management.
Found in your organisation. What's the difference?
Members with the estimating permission use it; your own administrators decide who.
Estimating holds your organisation's estimates: the pipeline of jobs you are pricing, and each estimate's drawings, take-off measurements and pricing tables. Estimates belong to your organisation, not to a project, and only its members can see them.
Tenders is where you price packages other organisations invite you to, and Procurement is where you send your own project's packages out to tender. Estimating is separate from both.
In the organisation sidebar, under Commercial, select Estimating.
Estimating opens on the pipeline, in one of two views:
- List: a register with the columns Ref, Name, Client, Stage, Value, Due, Owner and Updated. This is the default.
- Kanban: one column per open stage, then Won and Lost. Each column's header shows how many estimates it holds and their total value. A card's due date turns red once it has passed, unless the estimate is won or lost.
Each estimate has a reference such as EST-0001, numbered across your organisation.
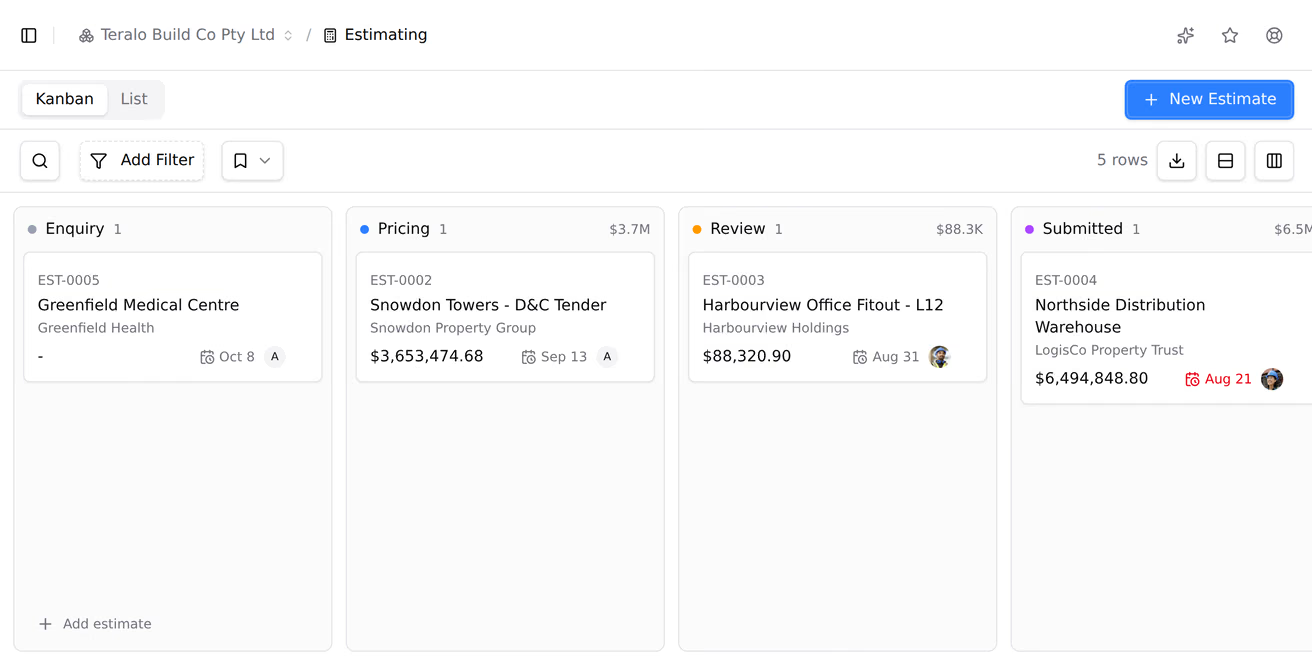
- Select New Estimate.
- Enter the Estimate name.
- Optionally, enter the Client, an Approx. value, the Tender due date and a Description.
- Select Create estimate.
The estimate joins the first open stage, with you as its owner. Its name, client, value, due date and description can't be changed once it's created, and the value doesn't change as you price.
Stages change on the Kanban view only. To move an estimate, either:
- drag its card to another column; or
- select the three-dot button on the card, then Move to and the column.
Moving an estimate to Won or Lost asks you to confirm. For Lost, optionally choose a Reason, or Other… to type one. Then select Mark as won or Mark as lost. An estimate can be moved back at any time.
Marking an estimate won doesn't create a project or a contract. The default stages include Archived, which has no column on the board, and an estimate can't be moved into it from the board.
Select an estimate's Ref or its card, or select View estimate in its row's three-dot menu.
An estimate is a workbook of tabs. Each tab is either a drawing or a pricing table. To add one, select + beside the tabs, then Add Drawing or New Table. Closing a tab deletes nothing, and closes it for everyone: reopen it from Open Drawing or Open Table in the same menu.
- In an estimate, select + beside the tabs, then Add Drawing.
- Choose files from Local Files or Drive: PDF, DWG or IFC, up to 250 MB each.
- Optionally, enter each drawing's name, Drawing no., Rev. and date, or select AI Autofill to read them from a PDF's title block.
- Optionally, set a Multiplier. It multiplies every quantity measured off the drawing, for example 8 for a typical floor that repeats eight times.
- Select Add N drawings, where N is the number of files.
A PDF's scale is set page by page:
- Select Calibrate scale and measure a distance you know on the drawing.
- Enter the Known distance.
- Optionally, tick Apply to all N sheets.
- Select Set scale.
To type a scale instead, select the scale in the toolbar (it reads Not calibrated until set), then choose a preset from 1:20 to 1:500 or enter your own. The same dialog holds the Drawing multiplier. A DWG drawing uses Drawing units instead.
Every measurement belongs to a dimension group.
- In Measurements, select the dimension group.
- Choose a tool:
- Distance for a line;
- from the area tools, Area (outline), Area by line pick or Fill area;
- from the count tools, Count (pins), Auto count by image or Auto count by text.
- Select points on the drawing. Press Enter or double-click to finish.
Backspace removes the last point, Esc steps back, and Del deletes the selected measurement. Ctrl+Z undoes and Ctrl+Y redoes. The info button Take-off shortcuts lists the rest. On a DWG drawing, the tools also include Polyline and Auto count by block.
To rename, reshape or delete a measurement, right-click it.
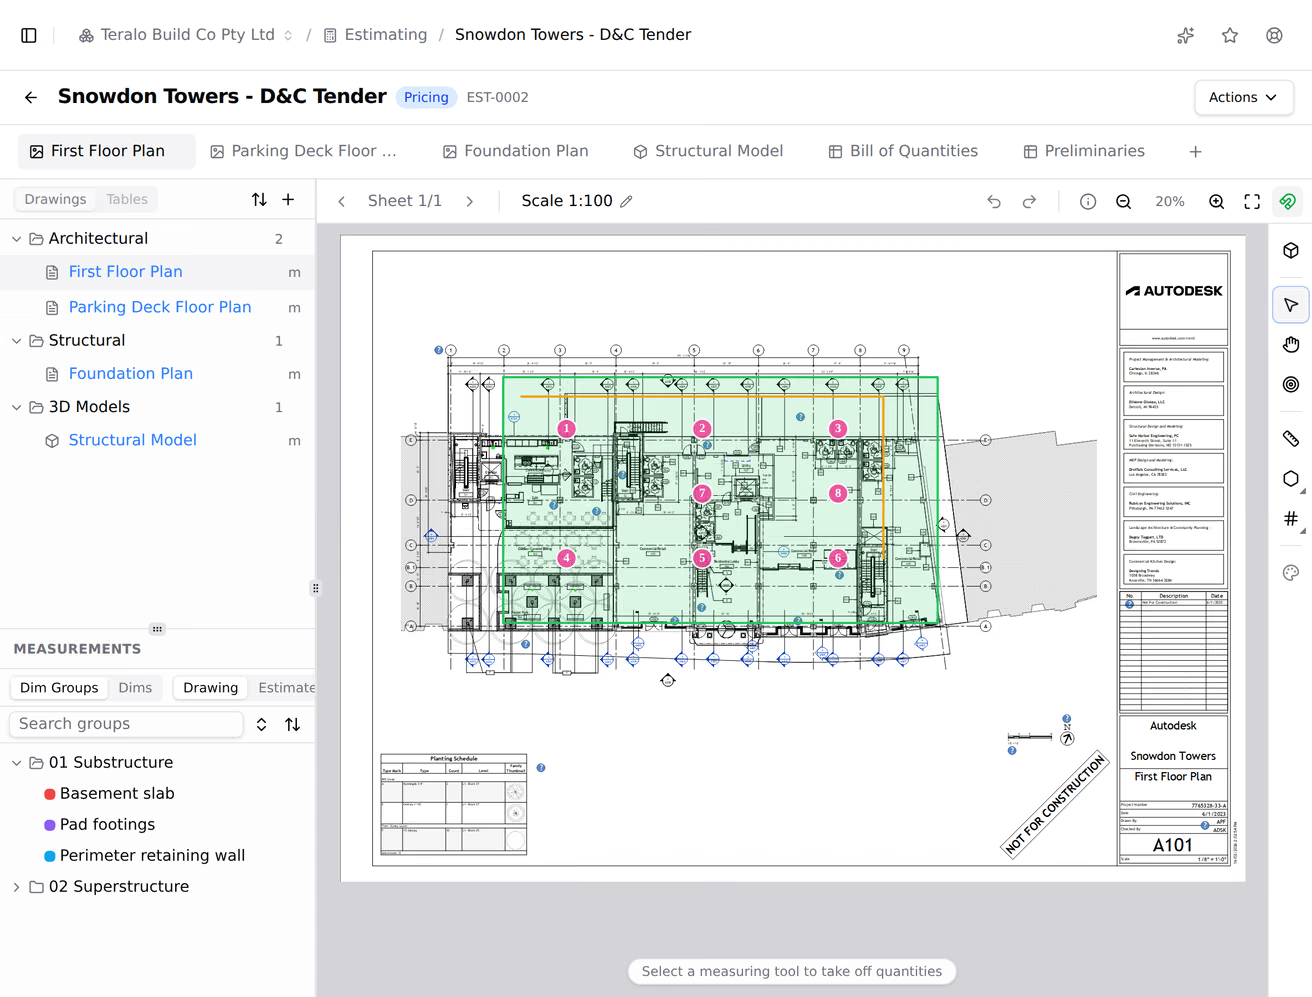
Select Cutout (deduct a void) from the area tools and draw the opening inside an existing area on the same sheet. The cutout subtracts from every quantity of its group and shows a Cutout badge. Lines and counts can't be deducted.
A dimension group adds up its measurements as six quantities: Count, Length, Area, Wall Area, Volume and Height.
- Wall Area is the length of each line and the perimeter of each area, multiplied by that measurement's own depth or the group's Default height (m).
- Volume is each area multiplied by its own depth or the group's Default thickness (m), plus any volume saved from an IFC model.
To create a group, select +, then New dimension group, enter a Name, choose a colour and select Create. To set its default height and thickness, open the group's three-dot menu and select Edit group.
Groups can sit in folders. Select +, then New folder, and use the folder's three-dot menu for New group here, New subfolder, Rename and Delete. A group created outside a folder can't be moved into one later.
Deleting a group deletes its measurements, and any table cell that used it shows #REF!.
- On an IFC drawing tab, select the sparkles button to open the Model Assistant.
- Ask for the quantity you need, for example the volume of the concrete slabs on level 2. The assistant filters the model by category, name or type, level and material.
- Where it answers with a single total, select Save as dimension. The quantity is saved into the active dimension group.
The model loads in your browser. The Model Assistant spends AI credits and isn't available in the mobile app.
- In the drawings list, right-click the drawing and select Supersede with new revision….
- Choose the new file. It must be the same file type.
- Select Supersede drawing.
Teralo copies every measurement to the same page and position on the new revision and flags each copy for review. The old drawing is marked Superseded, takes no new measurements, and its measurements stop counting towards groups and tables. Deleting the new revision restores the old one and deletes the copies.
- In an estimate, select + beside the tabs, then New Table.
- Enter a Name, then select Create table.
A table works like a spreadsheet. To use a quantity from the take-off, refer to its dimension group by name, for example =GETAREA("Basement slab"). The other functions are GETCOUNT, GETLENGTH, GETWALLAREA, GETVOLUME and GETHEIGHT. The cell updates whenever the group's measurements change, and renaming the group updates the formula.
Cells linked to a dimension group, a drill-down or a quote show in green. Selecting a linked cell highlights the group it uses in the Dimensions pane.

- Right-click the cell and select Drill down.
- Fill in the sub-table. Its default columns are Code, Description, Length, Width, Height, Factor and Quantity.
The sub-table's result comes forward into the parent cell: a pinned cell if there is one, otherwise a pinned column, otherwise the total of its rightmost number column. To open a drill-down again, select the green corner of its cell. Drill-downs can contain drill-downs.
Right-click a cell and select Compare alternatives… to compare options or suppliers' quotes for it. The comparison's AI fill from quote and AI build comparison spend AI credits.
The library holds your organisation's reusable lines, available in every estimate. On a table tab, select Library in the bottom of the sidebar.
To create a group, select +, then New rate group, New description group or New assembly group. A group's three-dot menu holds New sub-group, Move to, Rename and Delete. Groups nest within groups of the same kind.
- Rates: a code, description, rate and unit.
- Descriptions: a block of text.
- Assemblies: a description, quantity, unit and rate.
To use an item, drag it onto the table. A rate goes into the matching column, or asks which of its fields to insert. An assembly fills one row, with formulas for its subtotal and total. Deleting a library group doesn't change values already in a table.
On an estimate, select Actions, then Download handover bundle. It is also offered for a few seconds after an estimate is marked won on the Kanban.
The bundle is a zip file holding:
- a summary PDF, with each quote comparison and its winner;
- a CSV of every table, drill-downs included;
- the current PDF drawings with their measurements, plus a drawing register as PDF and CSV;
- a take-off summary CSV;
- the quote documents.
The quotes and drawings together can be up to 75 MB.
Warning: Deleting an estimate permanently deletes its drawings, measurements and tables.
- In the register, open the estimate's three-dot menu and select Delete. On an open estimate, select Actions, then Delete estimate.
- Confirm with Delete or Delete estimate.
Estimating's settings are at organisation level. In the organisation sidebar, under Organisation Settings, select Tools, then Estimating. Only organisations with a host account have these settings.
The open stages, in board order. Select Add stage to add one, and use the arrows, colour, name and delete controls on each. A stage that holds estimates can't be deleted, and there must be at least one open stage. Won, Lost and Archived can be renamed and recoloured only.
The choices offered when an estimate is marked lost. Enter a reason and select Add.
Select Save changes to save either list. Estimating has no approval workflow.
Estimating has four organisation permissions, in the Estimating row of your organisation's permission templates:
| Permission | Allows |
|---|---|
| Can view estimates and their take-offs and pricing tables | Opening the pipeline and estimates, and downloading reports and handover bundles |
| Can create and edit estimates, take-offs and pricing tables | Creating estimates, moving them through the pipeline, everything inside an estimate, and the library |
| Can manage estimating settings and administer all estimates | Changing the estimating settings |
| Can delete estimates | Deleting estimates, drawings, tables, dimension groups, folders and library groups |
They are granted inside your own organisation. Guests on your projects never see your estimates. Learn more about how permissions work.