Program
Plan the schedule and see what is holding work up.
Part of Resource Management.
Found in each project. What's the difference?
Folder access decides who sees each program; only hosts manage calendars and cashflow.
Program holds a project's construction schedules. An advanced program is a Gantt chart with linked tasks, calendars, a critical path, baselines and cost tracking. A basic program is a look-ahead sheet of rows and days painted in by colour.
In the project sidebar, under Resource Management, select Program. The register shows the project's programs and folders as cards, each program marked Advanced or Look-ahead. A project can have any number of programs.
On a program's card, the pencil opens it ready to edit, the two squares duplicate it, and the bin deletes it.
- On the register, select New Program.
- Choose Advanced or Basic.
- Enter the Name, and optionally a Description and the Project Start Date.
- Select Create.
The project's first program also creates a Standard 5-Day calendar.
A basic program is a sheet of sections and rows, with a responsible organisation against each row and days painted in that organisation's colour. Sections can sit inside other sections.
The sheet covers 1 to 12 weeks ahead, 4 unless you change it. Changes save as you make them. Its PDF is landscape, with a legend of the organisation colours.
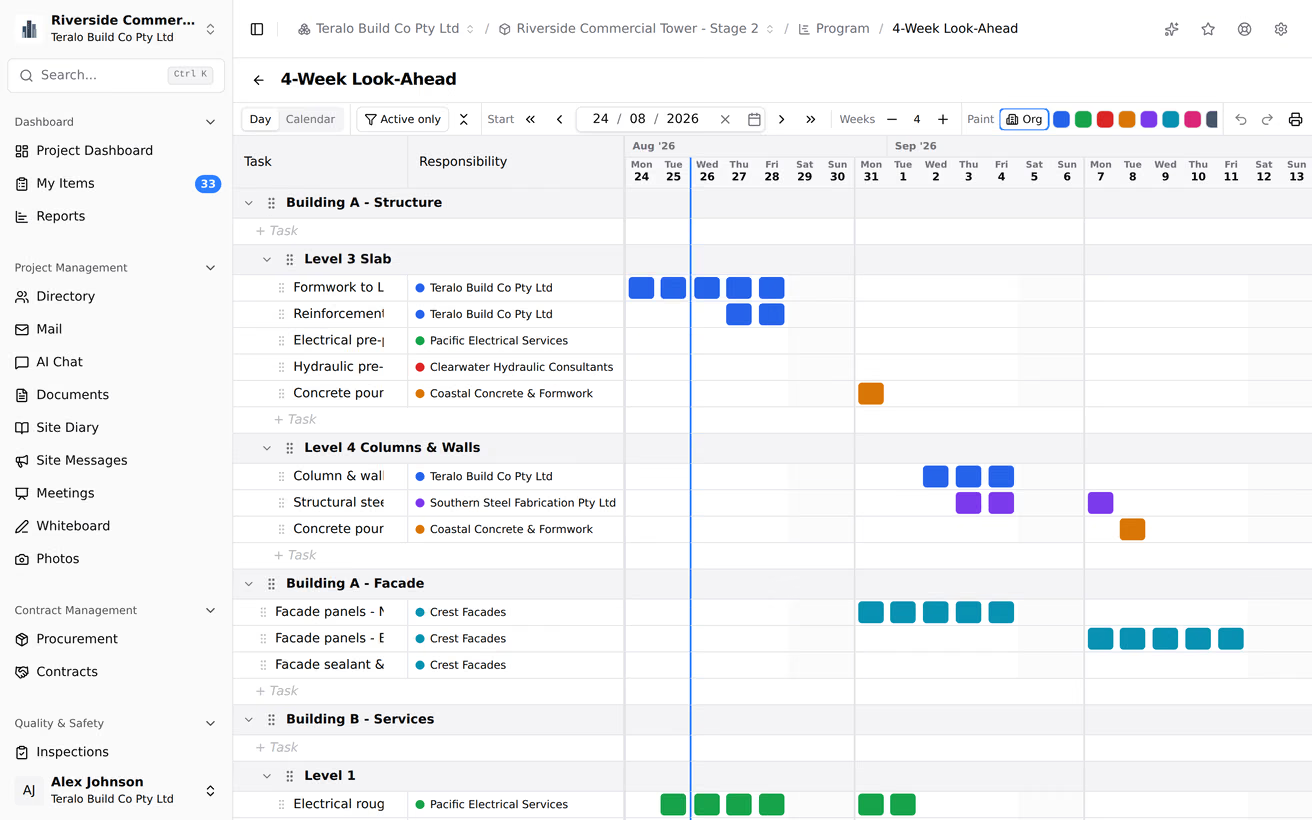
A basic program has no tasks, so it has no links, baselines, earned value or cashflow. The rest of this article is about advanced programs.
An advanced program opens read-only. To change it, select Edit at the start of the toolbar. The button reads Editing while you're editing. Select it again to stop; if you have unsaved changes, Teralo asks whether to discard them.
Editing needs Can create and edit programs and tasks.
- Select Add Task on the toolbar, or press Insert. To add a task in a particular place, right-click a row and select Insert Task Above or Insert Task Below.
- Type the task's name and duration into the table. Its bar appears on the Gantt chart on the right.
- To make a task part of the one above, select Indent, or press Ctrl+I. To move it back out, select Outdent, or press Ctrl+O.
A task with tasks under it is a summary task, and its dates come from the tasks under it.
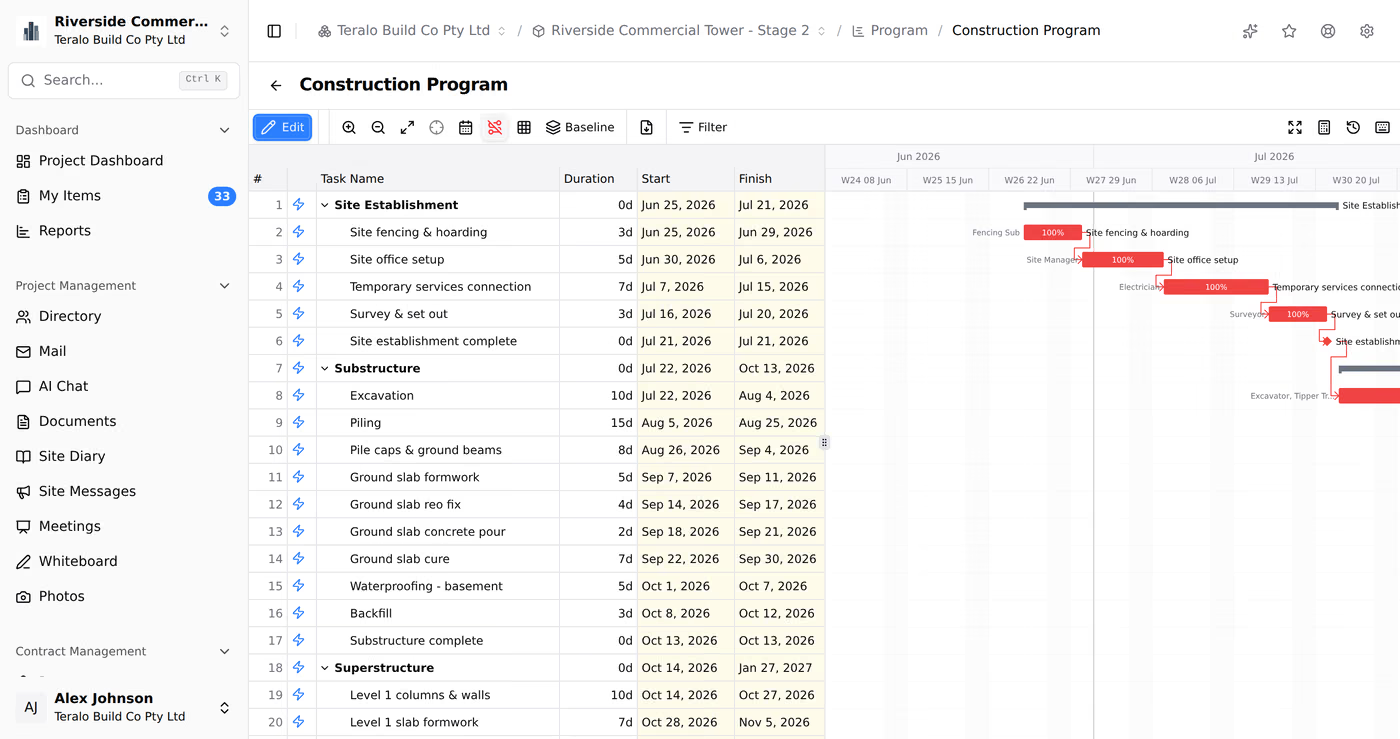
A duration is in working days, and can be a decimal: 2.5d. A task with a duration of 0 is a milestone.
A new task's duration is marked as estimated with a question mark, as in 1d?. To confirm it, untick Est. in the task's Task Information, or resize its bar.
To open a task's Task Information, double-click its row. Its tabs are General, Predecessors, Successors, Resources, Advanced and Cashflow. Select Save Changes to keep your changes.
On the Resources tab, choose the organisations doing the work from those with people on the project, or enter a name and select Add Custom. Each resource can have a number of units.
Link tasks in any of these ways:
- Select two or more tasks and select Link Tasks (FS chain).
- Drag from the connector on one bar to another bar.
- Type into a task's Predecessors column, such as 12FS+3d: row 12, finish to start, 3 working days later.
- On the Predecessors tab of Task Information, enter the link and select Add.
The four link types are FS (finish to start), SS (start to start), FF (finish to finish) and SF (start to finish). A lag is a whole number of working days, and a negative lag is a lead. In the Predecessors column, the lag needs its d: 3FS+2d is accepted, and 3FS+2 isn't.
To change or remove a link, right-click its arrow and select Edit Dependency or Delete Dependency.
The icon at the start of each row shows how the task is scheduled. A lightning bolt is auto, and a pin is manual. To switch, select the icon.
- Auto: Teralo sets the dates from the task's predecessors, calendar and constraint, and moves them when those change.
- Manual: the task keeps the dates you give it.
Dragging an auto task's bar, or its start, makes it manual.
On the Advanced tab of Task Information, choose the Constraint Type:
- As Soon As Possible, the default
- As Late As Possible
- Start No Earlier Than
- Start No Later Than
- Finish No Earlier Than
- Finish No Later Than
- Must Start On
- Must Finish On
Every constraint except the first two needs a Constraint Date. The same tab holds a Deadline, which is recorded with the task and doesn't change its dates.
A calendar sets the working days and hours, and its exceptions. Calendars belong to the project, so every program on it can use them. To set one up:
- In the project sidebar, under Project Settings, select Tools, then Program.
- Select Add Calendar, enter the Calendar Name, and select Create.
- Select Edit Calendar on the new calendar.
- Choose the Working Days and the Default Working Periods. For a split shift, select + Add period. To give one day different hours, select Customise on that day.
- Under Exceptions (Holidays, Shutdowns), enter the Start, End and Description of each holiday or shutdown, and select Add.
- Select Save Calendar.
An exception is a non-working period. A program's default calendar is set in its Program Settings, and a task can use another: choose it as the Calendar in Task Information.
Total float is how far a task can slip without delaying the finish. A task is critical when its float is at or below the program's Critical Path Threshold (days), which is 0 unless you change it. Manual and summary tasks are never critical.
To highlight the critical path, select Toggle Critical Path. The Float column is hidden to begin with; to show it, right-click a column heading and select Show/Hide Columns.
The Filter menu's Quick Filters are Critical Path, Milestones Only, 4 Week Lookahead (the next 28 days), Incomplete Tasks and Not Started.
To save a filter of your own:
- While editing, open the Filter menu and select Create Custom Filter....
- Enter the View Name, and choose whether to Match all conditions or any.
- Select Add Condition for each condition.
- Select Save View.
Saved views are in the same menu, for everyone on the program.
- Bar Formatting: double-click a bar, or right-click it and select Bar Formatting, to set its Bar Colour, Bar Pattern, Bar Shape and Text Labels.
- Gridlines: select Gridlines on the toolbar, for example to draw a line every 4 rows.
- Timescale Settings: double-click the timescale above the bars to set its tiers, from years down to hours.
Gridlines and the timescale reset when you leave the program. To zoom, use Zoom In and Zoom Out, or press Ctrl and scroll. The toolbar also has Fit to Window, Go to Today and Go to Task (Ctrl+G).
While editing, select the save button, or press Ctrl+S. Each save is a numbered revision. The toolbar shows Unsaved changes until you save. If someone else saved the program after you opened it, Teralo refuses the save and says so.
Every five minutes while you have unsaved changes, Teralo saves an auto-save draft. If you leave without saving, the program shows that it recovered your changes when you next open it.
Undo is Ctrl+Z, and redo Ctrl+Shift+Z or Ctrl+Y. Saving clears the undo history. For every shortcut, select the keyboard button (Keyboard Shortcuts) or press ?.
Select Revision History on the toolbar to see each save: who saved, when, a summary such as "Modified 12 tasks, Added 3 dependencies", and each field that changed. A revision can't be restored.
A baseline is a named copy of every task's saved dates, duration and cost budget, taken when you choose.
- While editing, open the Baseline menu on the toolbar and select Save Baseline....
- Enter the Baseline Name, such as Original Plan.
- Select Save Baseline.
Saving a baseline emails the members of the host organisation on the project who can view programs.
Choose a baseline in the Baseline menu. Teralo adds the BL Start, BL Finish, Start Var. and Finish Var. columns and draws the baseline bars under the tasks. A variance is in signed weekdays, so +6d is six weekdays later than the baseline. It counts Monday to Friday, not the program's calendar.
To delete a baseline, select the cross beside it in the menu.
The Cost Budget, Cost Actual, Earned Value and Cost Var. columns are each hidden to begin with. Earned Value is the budget multiplied by percent complete, and Cost Var. is earned value less actual cost.
Select Earned Value Analysis on the toolbar for the program's figures against the selected baseline: BAC, BCWS (planned), BCWP (earned), ACWP (actual), schedule and cost variance, EAC, ETC and VAC, plus SPI and CPI.
- SPI is earned value divided by planned value. Above 1 is ahead of schedule.
- CPI is earned value divided by actual cost. Above 1 is under budget.
The figures need cost budgets on the tasks, a baseline chosen in the Baseline menu, and the program's Status Date. Without a status date, planned value is 0.
The Revenue and Cost columns show how many schedule of values items are assigned to each task. To assign them, select a task's cell in either column to open its Cashflow tab:
- Under Revenue, Contracted Cost or Forecast to Complete, add the items the task delivers.
- Choose how each spreads across the task's dates: Linear, Back-loaded or S-Curve.
Assignments save straight away. From then on, the money falls in the months the task spans, and moves when the task moves. A schedule of values item with no task shows only its actuals in the forecast. Learn more about cashflow.
- While editing, select Import XML.
- Choose the XML file, up to 10 MB.
- If the program already has tasks, tick Replace existing tasks and dependencies.
- Select Import, then Done.
Teralo imports the tasks and their structure, links, resources, constraints, deadlines and costs, and adds the file's calendars to the project's. It reads the XML file Microsoft Project saves, not an MPP or Primavera file.
- Select Export PDF on the toolbar.
- Choose the Page Size (A3 to begin with) and Orientation.
- Choose whether to include the task table, and the baseline bars if a baseline is chosen.
- Select Export PDF.
The dialog shows how many tasks and roughly how many pages the PDF will have. Anyone who can view the program can export it.
To make a folder, select New Folder on the register, enter the Name, and select Create.
To control who sees a folder's programs:
- Select the shield on the folder (Manage folder permissions).
- Choose a Permission Template.
- Tick View, Edit, Delete or Manage.
- Select Grant Permission.
A grant covers the folders inside it too, and applies to host and guest staff alike. A program in no folder follows the project permissions. Anyone with Can manage all program settings, delete programs, and manage baselines sees every folder.
To move programs into a folder, select them on the register, select Move, choose the folder, and select Move here. Deleting a folder moves its programs to the top of the register.
To duplicate a program, select the two squares on its card, enter a name, and select Duplicate.
Warning: Deleting a program is permanent.
To delete a program, select the bin on its card, then Delete.
Guests see programs on the same rules as host staff: the programs in the folders their permission template can open, and every program in no folder. None of the program permissions is limited to the host, so a guest with Can create and edit programs and tasks can edit.
Cashflow is for host staff only. Guests see the Revenue and Cost counts, but can't open the cashflow. Baseline emails go to host staff only.
Project Settings, then Tools, then Program holds the project's calendars, described above. Only host staff can open it.
Each program's own settings are under Program Settings on the toolbar, while editing:
- Project Start Date
- Status Date
- Default Scheduling Mode
- Critical Path Threshold (days)
- Default Calendar
Select Save Settings to keep your changes. At organisation level, Tools, then Program describes the standard calendar patterns (5-Day, 6-Day, 7-Day and Night Shift), with nothing to set. Program has no workflow.
| Permission | Allows |
|---|---|
| Can view project programs and schedules | Opening programs read-only, and exporting them |
| Can create and edit programs and tasks | Creating, editing, saving, duplicating and importing programs, baselines, saved views and folders |
| Can manage all program settings, delete programs, and manage baselines | Program Settings, calendars, folder access, moving programs, and deleting baselines |
| Can permanently delete programs | Deleting programs |
Manage includes create, and create includes view. Despite its name, the manage permission doesn't include deleting programs. Inside a folder, the folder's grants decide what each person can do.
Cashflow has two permissions of its own, Can view project cashflow page and Can assign SoV items to program tasks for cashflow, which only host staff can hold. In the permissions grid, they sit under Resource Management with Program. Learn more about how permissions work.