Setting up your organisation
Create your organisation and set its name, logo and address.
Found in your organisation. What's the difference?
Members with the settings permission edit it; only administrators appoint administrators.
Your organisation is your company's account in Teralo. It holds your members, settings and plan, and, for a host organisation, the projects it runs. This article covers creating an organisation and the Organisation Settings page. Learn more about organisations and projects.
Anyone can create a guest organisation. A host organisation needs the code from a signed Order Form.
To open the wizard, on Home, select New, then Create Organisation. You can also select Create New Organisation on your profile. If you're signing up, select Create one here on the Organisation step.
- Enter the Organisation Name and choose the Country / Region.
- Optionally, enter your business number and select Verify.
- Select Create Organisation. If Teralo finds organisations with a similar name, it lists them. Select Join Instead beside yours, or select the button to create your own.
- Tick I agree to the Subscription Terms, then select Create Organisation.
- Choose the base Currency, then select Continue. Teralo creates the organisation.
- Optionally, enter a Description, choose a Primary Discipline and enter a Mail Reference Prefix, then select Continue.
- Optionally, add a logo and your main office address, then select Continue.
- On Tool Setup, select Create with Defaults, or select Start blank instead and then Continue.
- On Organisation Created!, select Continue.
You become the organisation's administrator, and it becomes your active organisation. Learn more about guest organisation setup.
Create with Defaults sets up permission templates, workflow templates, and the types, statuses and categories each tool uses, all of which you can change afterwards. Learn more about the tools catalogue.
- On the first step, select Have a code? Enter it.
- Enter the Agreement code from your Order Form, then select Apply.
- Continue through the steps, ticking the box that confirms the Order Form.
- On Set Up Billing, select Create & Subscribe. There is no card to enter.
- Choose your Tool Setup.
A host organisation skips the logo and address step, so add them on the Organisation Settings page afterwards. If you don't have a code, select Talk to Sales. A guest organisation can also become a host later from billing.
To set up the rest of a host organisation before its first project, work through its setup checklist. Learn more about host organisation setup.
On the first step, Teralo reads the website at your email address's domain and may suggest your organisation's name, description, discipline, office address and logo, in a card reading "Found on" and the domain.
- To fill in the empty fields with them, select Use these details. Teralo never replaces anything you have typed.
- To ignore them, select No thanks.
There is no suggestion for a webmail address, or for a website Teralo cannot read.
The business number is optional. Its label follows the country: ABN in Australia, Company Number in the United Kingdom and NZBN in New Zealand. People can search for your organisation by name, business number and country when they ask to join it.
To check an ABN against the Australian Business Register, enter all 11 digits and select Verify. The result is one of:
- Green: "Strong match with the name you entered", with the ABN's status and any trading names.
- Amber: "Partial match. Verify this is the correct entity for your organisation." An ABN that isn't found also shows in amber.
- Red: "This ABN is registered to a different name than you entered." You can still create the organisation.
A United Kingdom or New Zealand number can't be verified yet: its button reads Verify · Soon.
You choose the base currency on the Currency step, from the one Teralo selects for your location. It is the currency every money figure displays in, on the organisation and on the projects it hosts.
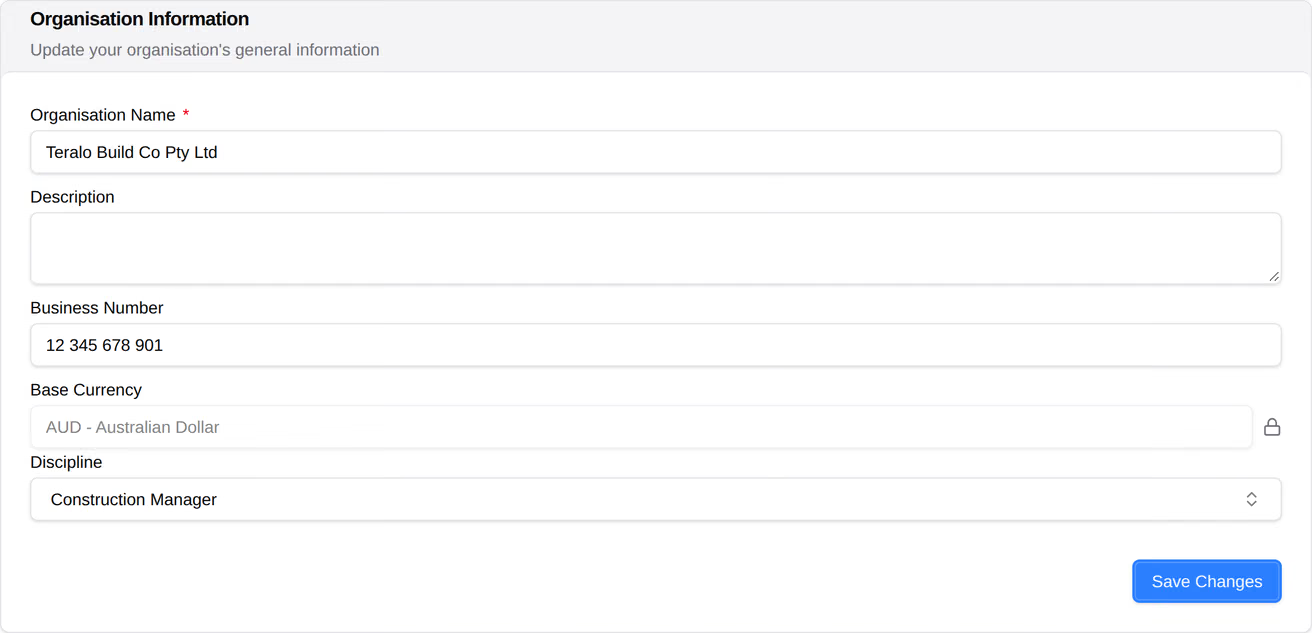
You cannot change the base currency afterwards. On Organisation Settings it shows with a padlock. To change it, contact support.
In the organisation sidebar, under Organisation Settings, select Settings. The page opens only for your active organisation. A badge beside Settings counts compliance documents that are overdue or expiring.
The Organisation Information card holds the Organisation Name (2 to 100 characters), Description (up to 500 characters), Business Number, Base Currency and Discipline.
- Edit the name, description or business number.
- Select Save Changes.
The Discipline is chosen from a list, grouped by trade, and saves as soon as you choose it.
The mail prefix starts the number of every mail on the projects your organisation hosts. You can set it when you create the organisation. Without one, Teralo makes a prefix from the organisation's name.
To change it on a host organisation:
- In the organisation sidebar, under Organisation Settings, select Tools, then Mail.
- Select the Mail Prefix tab, then the pencil icon.
- Enter the Mail Prefix, up to 8 letters and numbers, then select Save.
Mail already sent keeps its number. Learn more about mail.
- On the Main Office Address card, select Search for an address... and start typing.
- Choose the address from the list. Teralo fills in the street, city, state, postcode and country.
- Check the fields and the Office Name, then select Save Address.
The Organisation Visuals card holds a square Logo and a 16:9 Cover Photo. The logo shows beside your organisation's name, and the cover photo on its card on Home.
- Select the logo or cover photo box, or drag an image onto it.
- Use the zoom slider to fit the image, then select Crop.
To remove an image, select the red cross on its corner. Teralo removes it straight away.
The Desktop editing card has one switch, Allow documents to be edited on desktop computers, and it is off by default. With it on, people in your organisation can open its Drive documents in an application on their own computer through the desktop app, and each save comes back to Teralo as a new version. On Windows, they can also use Teralo Drive. Each person also turns these on in the desktop app on their own computer.
Turning the switch off deletes nothing from Teralo. Teralo Drive removes the organisation's folder from each computer, keeping any file with changes that have not been sent. Copies opened with Edit in desktop app stay on each computer, and Teralo refuses their next save. Learn more about the desktop app.
The Compliance Documents card holds your organisation's own insurances, licences and certifications.
- Select Add Document.
- Enter the Document Name and choose the Category: Insurance, Licence, Certification or Other.
- Optionally, set an Expiry Date and attach a file.
- Select Add Document.
A document due to expire within 30 days shows as Upcoming, and an expired one as Overdue. To replace a document with a new one, select the circular arrows on its row. To submit a document against a host's requirement on a project, learn more about compliance documents.
An administrator holds every permission in the organisation and on the projects it hosts, except for tools its plan leaves out. Only an administrator can add or remove another one, and an organisation always keeps at least one. Learn more about how permissions work.
To add an administrator:
- On the Organisation Administrators card, select Add Administrator.
- Choose a member, then select Add Admin.
To remove one, select the bin icon on their row, then Remove Admin. Teralo emails the person each time.
Warning: Closing an organisation archives every project it hosts, read-only for everyone, removes every member, you included, and cancels its subscription. Only Teralo support can reopen it.
Only an administrator can close an organisation, and an organisation on an agreement negotiated with Teralo can't be closed while the agreement is in place. Closing deletes no records.
- At the bottom of the page, select Close Organisation.
- Check the list of what closing affects.
- Type the organisation's name exactly, then select Close Organisation.
Two permissions, shown as View and Edit on the Settings row of a permission template:
- Can view organisation settings: opens the page.
- Can manage organisation settings: saves the organisation information, the address and the desktop editing switch.
Administrators hold both. Only administrators add or remove administrators and close the organisation. Managing tools, people, permissions and billing each take their own permission.
No. An administrator can close it, which ends its use and keeps its records. Only Teralo support can reopen a closed organisation.