Jobpac
Send approved claims, direct costs and variations to Jobpac.
Jobpac is Trimble's construction accounting software. With Jobpac connected, Teralo sends approved progress claims, direct costs and variations to Jobpac, and reads back what Jobpac has paid on them.
Only a host organisation can connect Jobpac. Part of the setup happens in Jobpac, and part in Teralo.
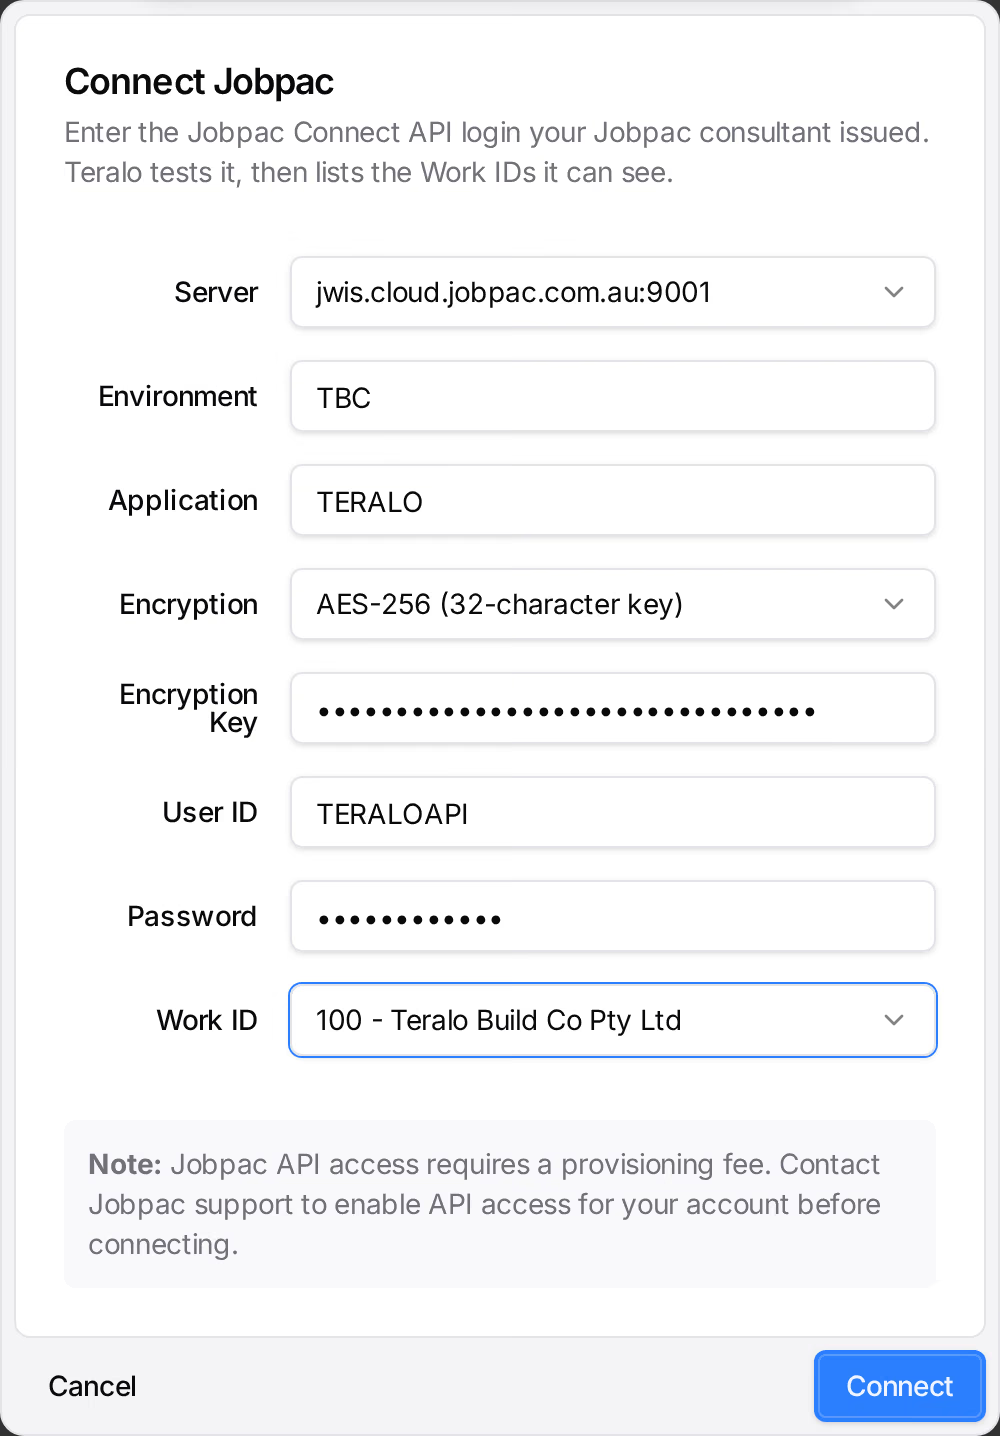
- A Jobpac Connect API login: the Server, Environment, Application, Encryption Key, User ID and Password Jobpac issues. Jobpac charges a provisioning fee for API access.
- Work ID access for the API user, for each Work ID Teralo posts to, and for the Work ID that holds your creditors if it is a different one.
- The External Subcontract Portal turned on for each Work ID, named TERALO. Jobpac support sets it.
- Enable TERALO ticked on each Job whose subcontract claims come from Teralo.
- In Teralo, Can connect, disconnect and configure accounting software integrations (Xero, MYOB, QuickBooks, Jobpac). Organisation administrators hold it.
Contact Jobpac support and ask for:
- A Jobpac Connect API login for the application TERALO.
- Access for the API user to each Work ID Teralo will post to.
- Access to the Work ID that holds your creditors, if it is a different one. Without it, Jobpac refuses subcontract claims with "You do not have access to this work id".
In Jobpac's user list, the API user shows *DEACTIVATED and no sign-in date. Jobpac sets up every API user that way, and the API still works. Jobpac's own screens don't accept the API user, and answer "#0922 This is not a valid User ID". Ask Jobpac support for any change to it.
Jobpac support turns the portal on for each Work ID, in the system parameter TEXACT (External Subcontract Portal):
- External Subcontract Portal Active (Y/N): Y.
- Name of External Subcontract Portal: TERALO.
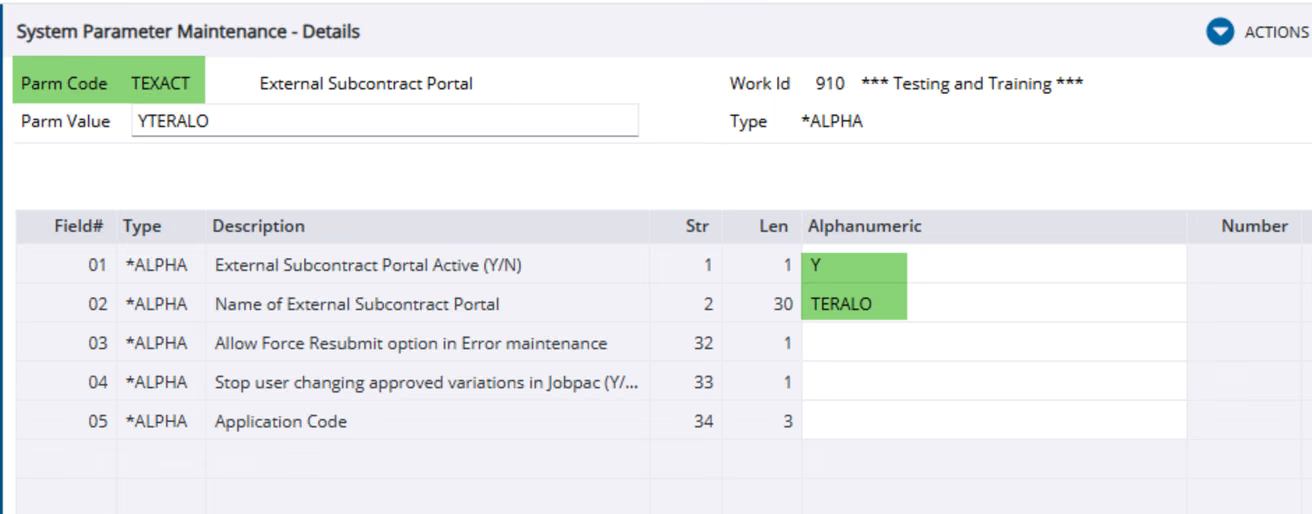
The portal's name labels the box on each Job and agreement, so it reads Enable TERALO. Ask for the portal on every Work ID Teralo posts to, test Work IDs included.
Only a person with 3 Pty SC access can tick Enable TERALO on a Job, and every user starts without it. A Jobpac administrator grants it:
- In Jobpac, in Search for Function, enter Job Maintenance Access and open it.
- Find the person's User ID, and the row for the Work ID.
- In the 3 Pty SC column, enter Y.
- Repeat for each Work ID, then save.
Tick the box on a Job before the first subcontract claim on it is sent.
- In Jobpac, in Search for Function, enter Setup Jobs and open it.
- Open the Job.
- On the TYPE tab, tick Enable TERALO. It sits beside Disable Excel In Progress Claim.
- Select OK, and enter a reason for the change when Jobpac asks.
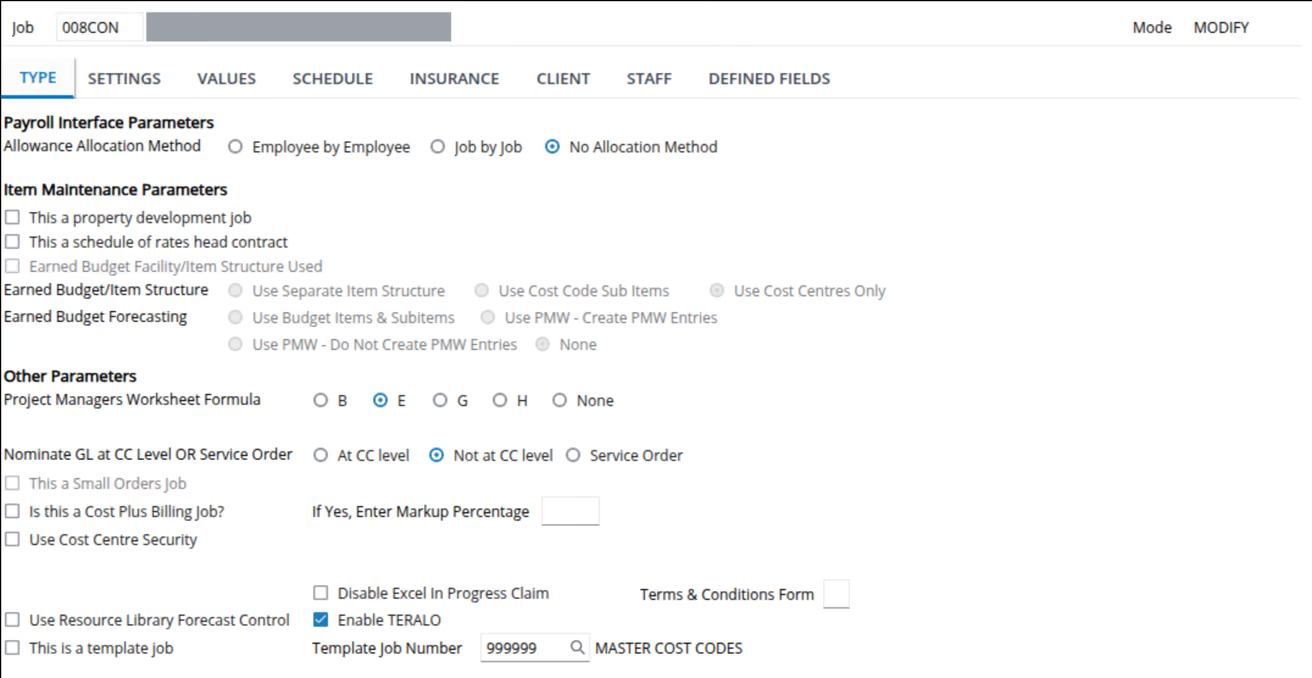
If the TYPE tab has no Enable TERALO box, the Work ID's External Subcontract Portal is off, or you don't have 3 Pty SC access for the Work ID. Jobpac's API can't tick this box, so Teralo can't tick it for you.
- In the organisation sidebar, under Organisation Settings, select Tools.
- Under Contract Management, select Accounting.
- Select Connect Jobpac.
- Choose the Server and the Encryption, and enter the Environment, Application, Encryption Key, User ID and Password Jobpac issued.
- Select Find Work IDs. Teralo tests the login and lists the Work IDs the API user can see.
- Choose the Work ID, then select Connect.
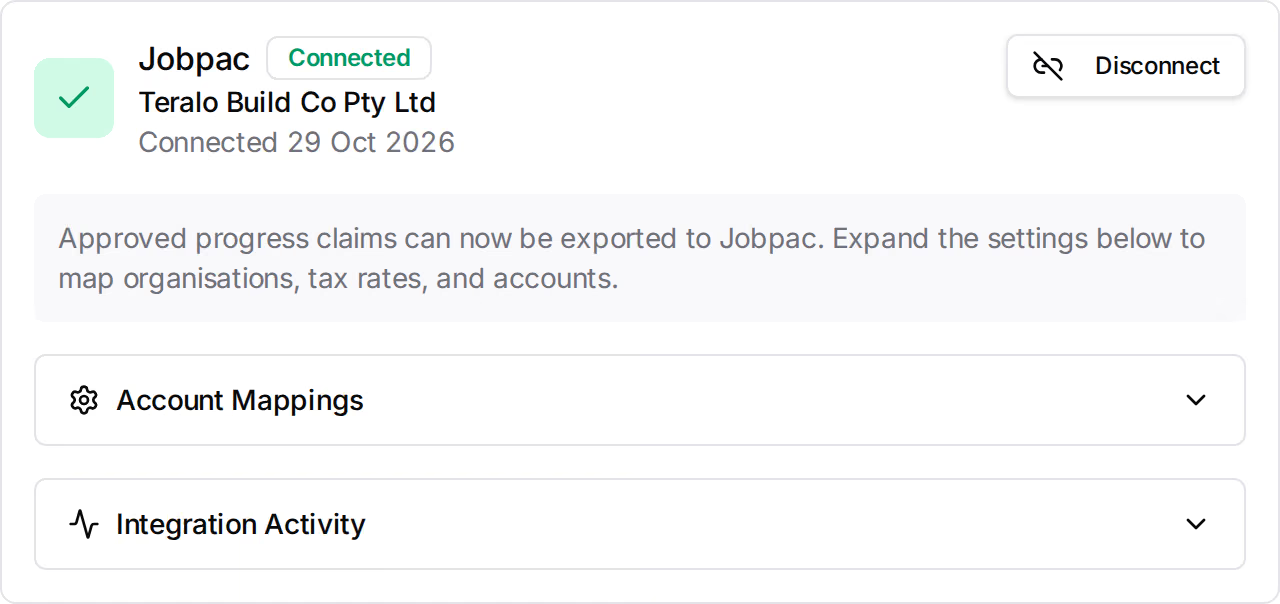
Teralo shows Jobpac with a Connected badge and the Work ID's name. An organisation connects one accounting package at a time, so Connect Jobpac shows only while nothing else is connected.
If Teralo answers "Jobpac accepted the login, but it can see no Work IDs", ask Jobpac support to give the API user access to your Work ID. Learn more about integrations.
The Jobs & Orders tab lines up each project with its Jobpac Job, and each cost contract with its subcontract agreement (an Order in Jobpac).
- On the Accounting page, open Account Mappings, then select Jobs & Orders.
- Under Projects, choose each project's Job in Select job....
- Under Cost contracts, choose each contract's agreement in Select order.... A project's agreements are listed once the project is linked to its Job.
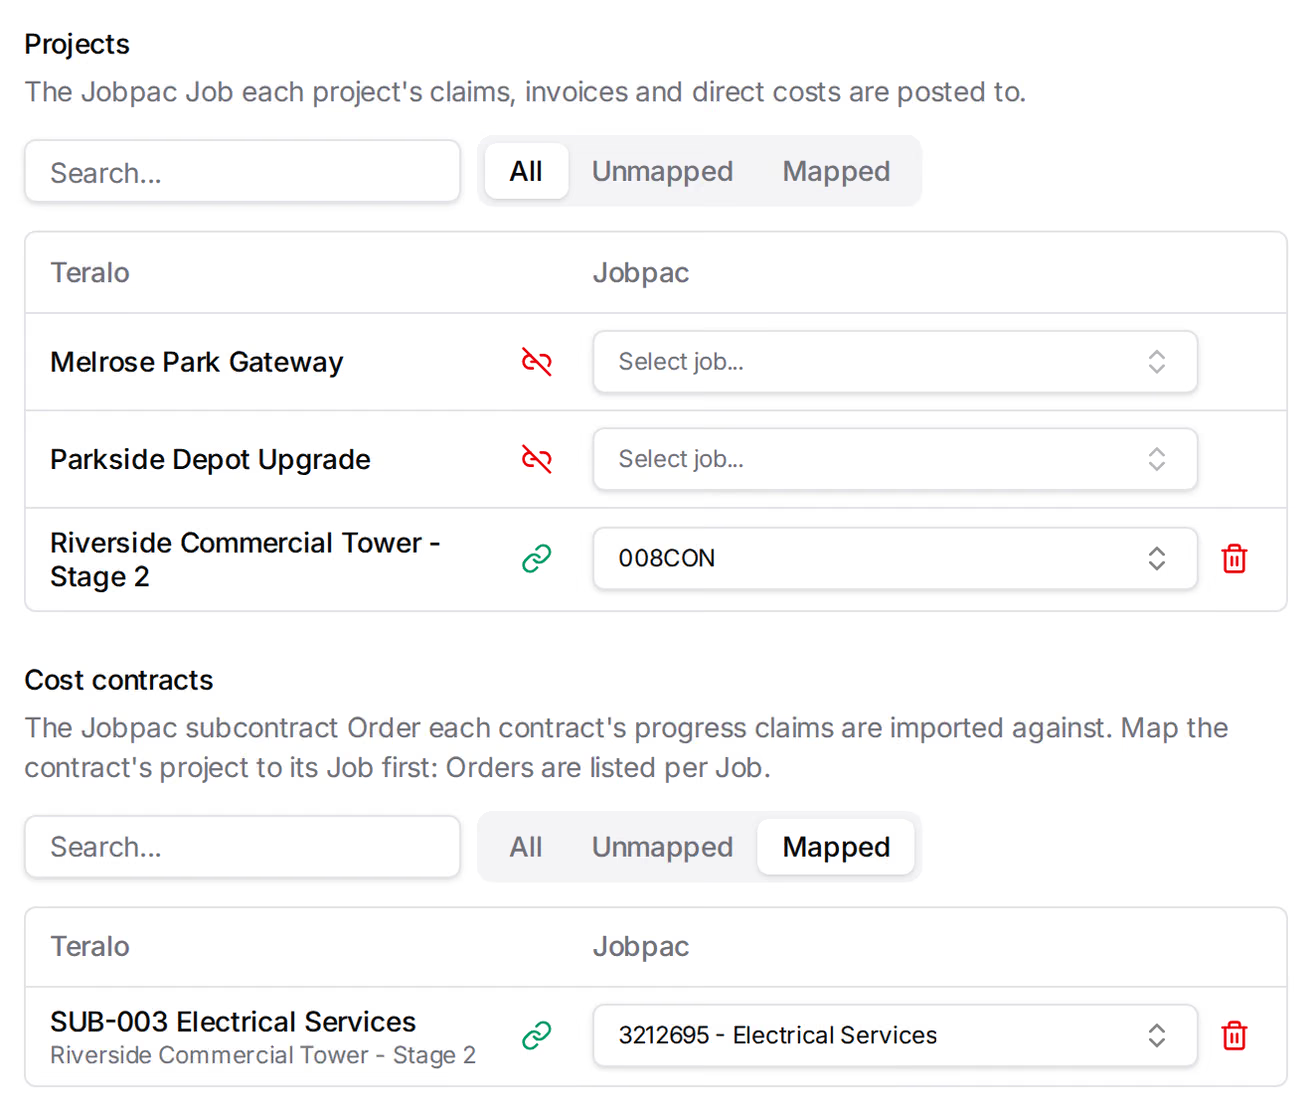
A contract links to one agreement, and an agreement to one contract. To remove a link, select the bin icon at the end of the row.
The Organisations tab gives each organisation a Creditor (cost) slot, for who you pay, and a Debtor (revenue) slot, for who you bill. An organisation can be both.
- Under Account Mappings, select Organisations.
- For each organisation, choose the creditor or the debtor, then select Link. Where a creditor's ABN matches the organisation's, Teralo offers it as ABN match, with Link beside it.
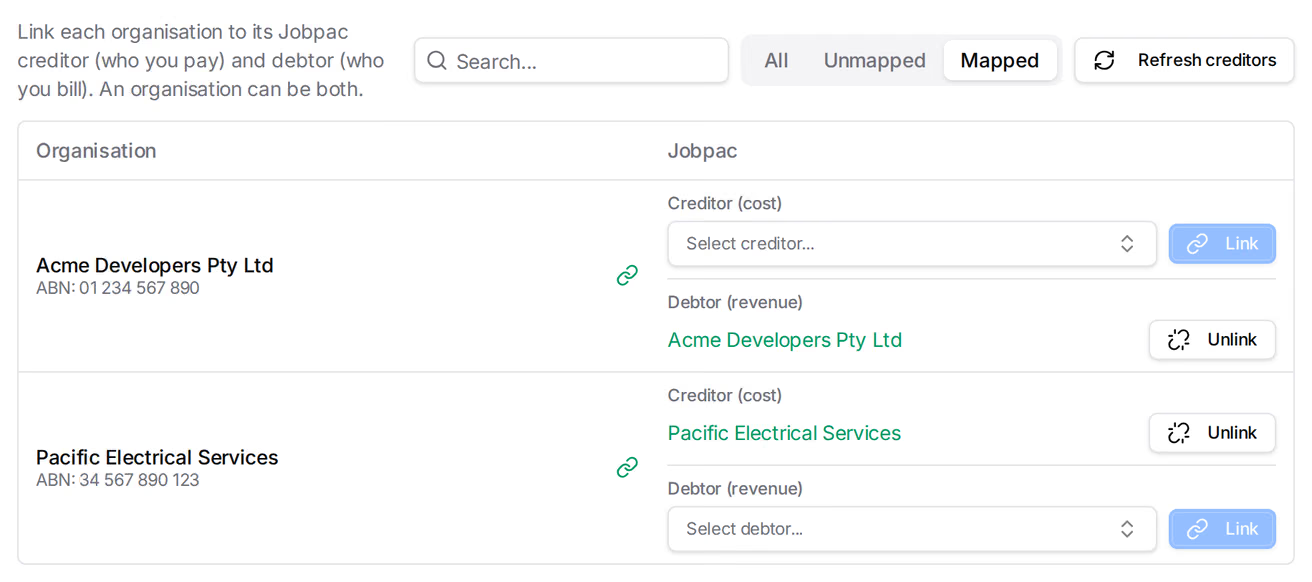
Teralo keeps a copy of your Jobpac creditor list. After adding a creditor in Jobpac, select Refresh creditors.
- Tax Rates: map every Teralo tax rate to a Jobpac tax code, GST-free included. Jobpac has no code for no tax, so an unmapped rate stops the export. One mapping serves both purchases and sales.
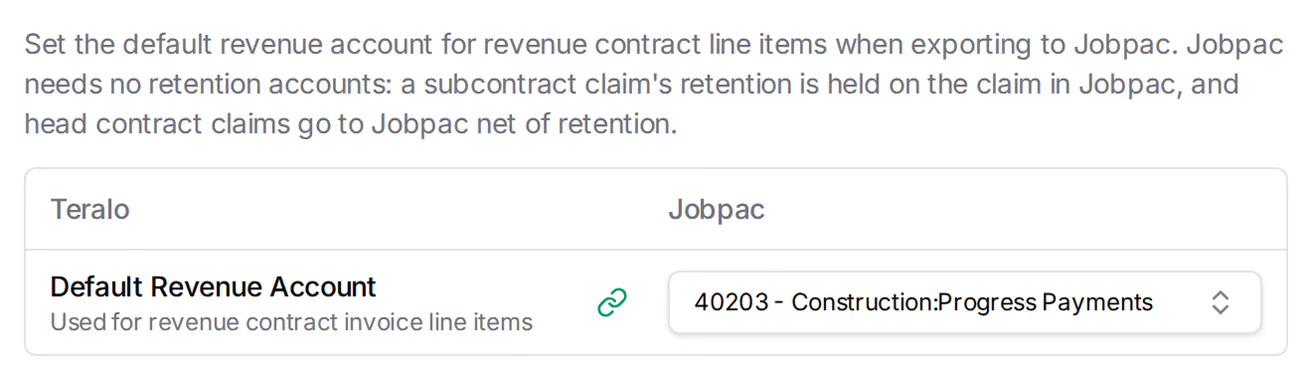
- Revenue: the Default Revenue Account, for the lines of a revenue contract's claims.
- Budget Codes: the Default Expense Account, for direct costs, and optionally an account for each budget code.
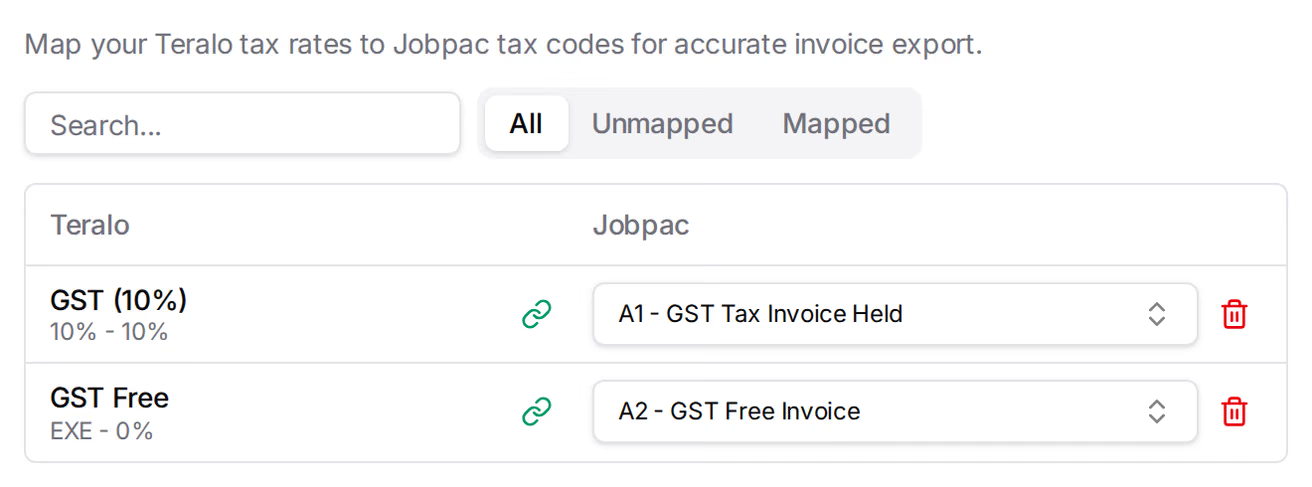
Jobpac has no Retention tab. A subcontract claim carries its retention on the claim, and a revenue claim goes to Jobpac net of retention.
A subcontract claim takes its accounts from its agreement in Jobpac, so a cost contract's claims need no accounts in Teralo.
You can link a cost contract to its agreement when you create it, or later on its Settings tab. Both write the same link as the Jobs & Orders tab.
- On the project's contracts register, select Create Contract.
- Set Contract Classification to Cost Contract, and choose the Contracted Organisation.
- If the organisation isn't linked to a creditor yet, choose one in Jobpac Creditor. This links the organisation for every contract.
- Optionally, choose the agreement in Jobpac Agreement. The list shows the agreements on the project's Job, narrowed to the organisation's creditor.
- Finish the form and create the contract.
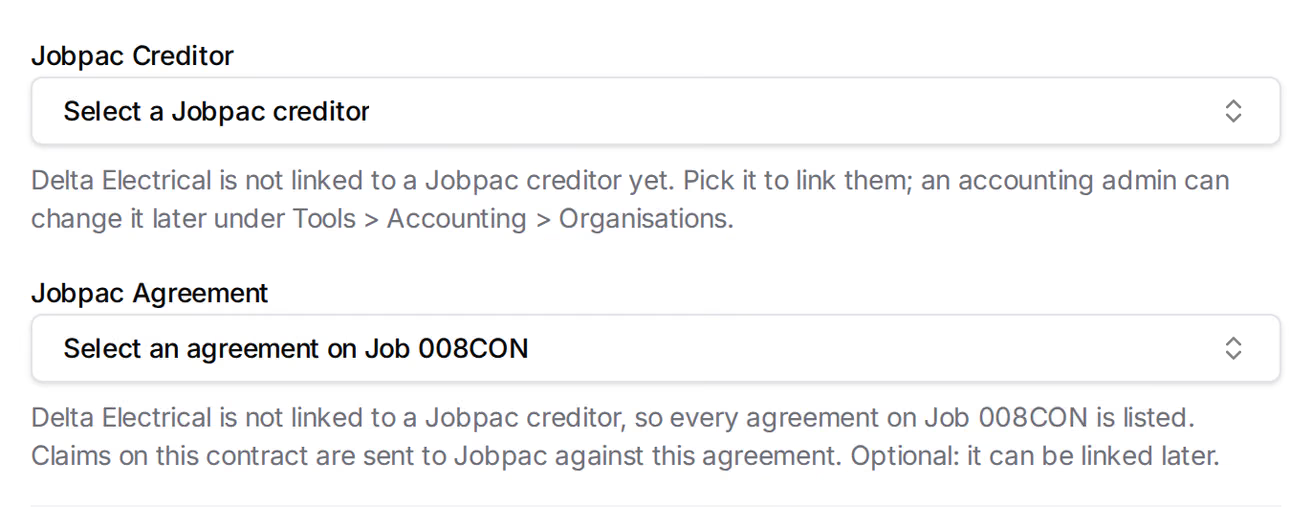
An agreement already linked to another contract shows Linked to and that contract's number, and can't be chosen. Choosing an agreement fills an empty Contract Title with its description.
- Open the contract and select Settings.
- In the Jobpac card, choose the agreement in Jobpac Agreement.
- Select Save Jobpac Link.
To remove the link, choose Not linked, then select Remove Jobpac Link. Changing the link needs Can edit contracts.
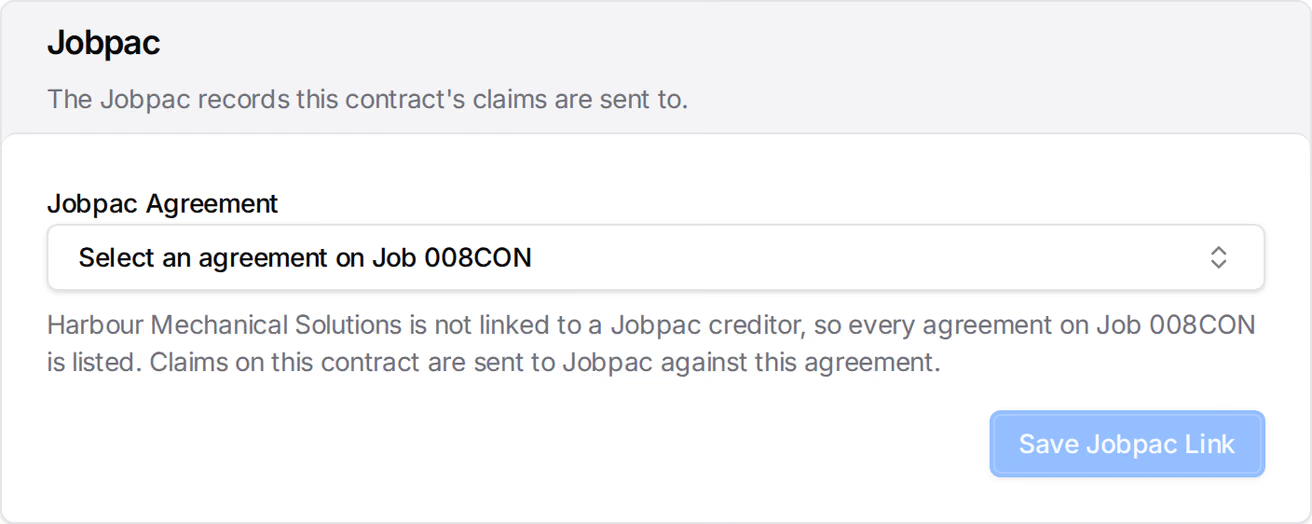
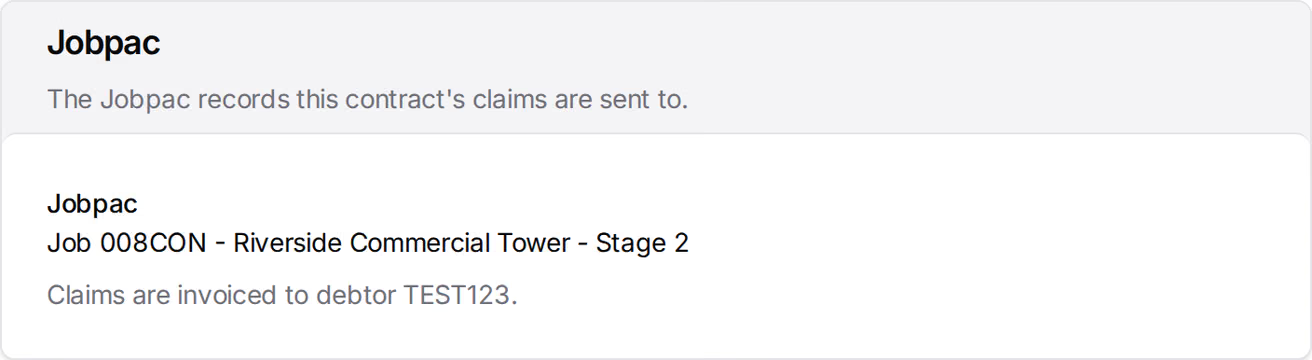
Once a claim on the contract has gone to Jobpac, the link can't change. A revenue contract's card shows the project's Job and the debtor its claims are invoiced to.
The contract's header shows its agreement to host staff, for example Jobpac 3212695.

Each agreement has its own Enable TERALO box, in Maintain S/C Agreement. When you link a contract to an agreement, Teralo ticks the box in Jobpac:
- The agreement has no claims in Jobpac yet: Teralo ticks the box.
- The agreement already has claims in Jobpac: Teralo leaves the box alone, and says so. A Jobpac administrator decides whether to tick it.
- Jobpac refuses: the link still saves, and Teralo tries again when the next claim is sent.
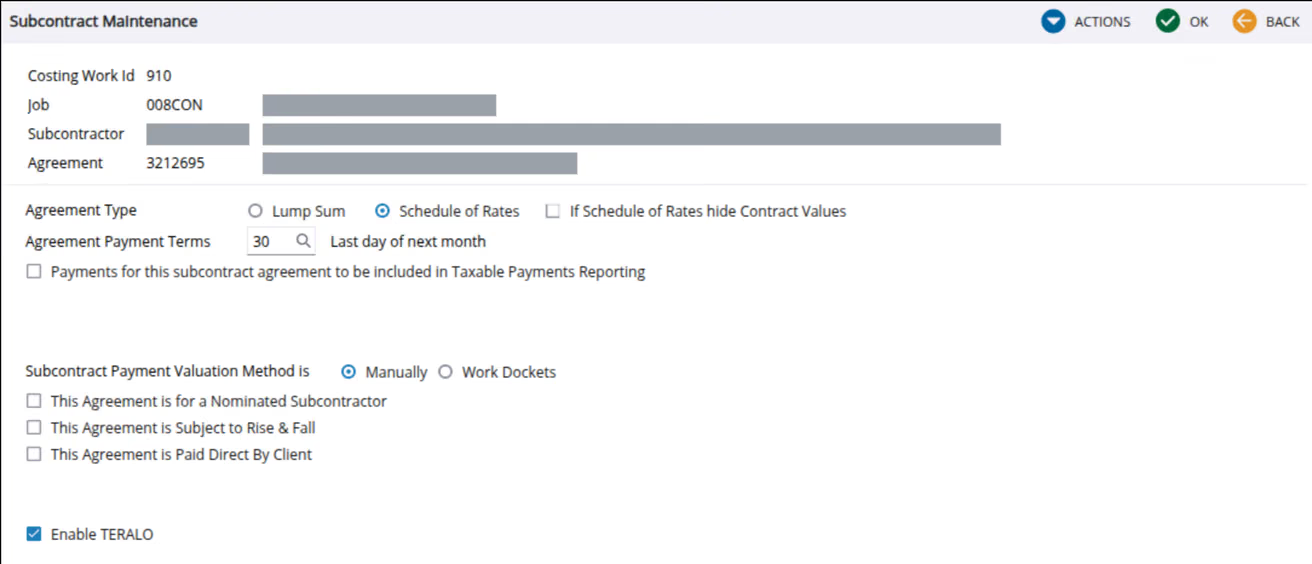
Warning: Once an agreement has Enable TERALO ticked, nobody can enter a claim on it in Jobpac's Prepare S/C Payment. Every claim on that agreement must come from Teralo.
Opening the agreement in Prepare S/C Payment shows "#0834 Payment not available because subcontract uses external system for claims".
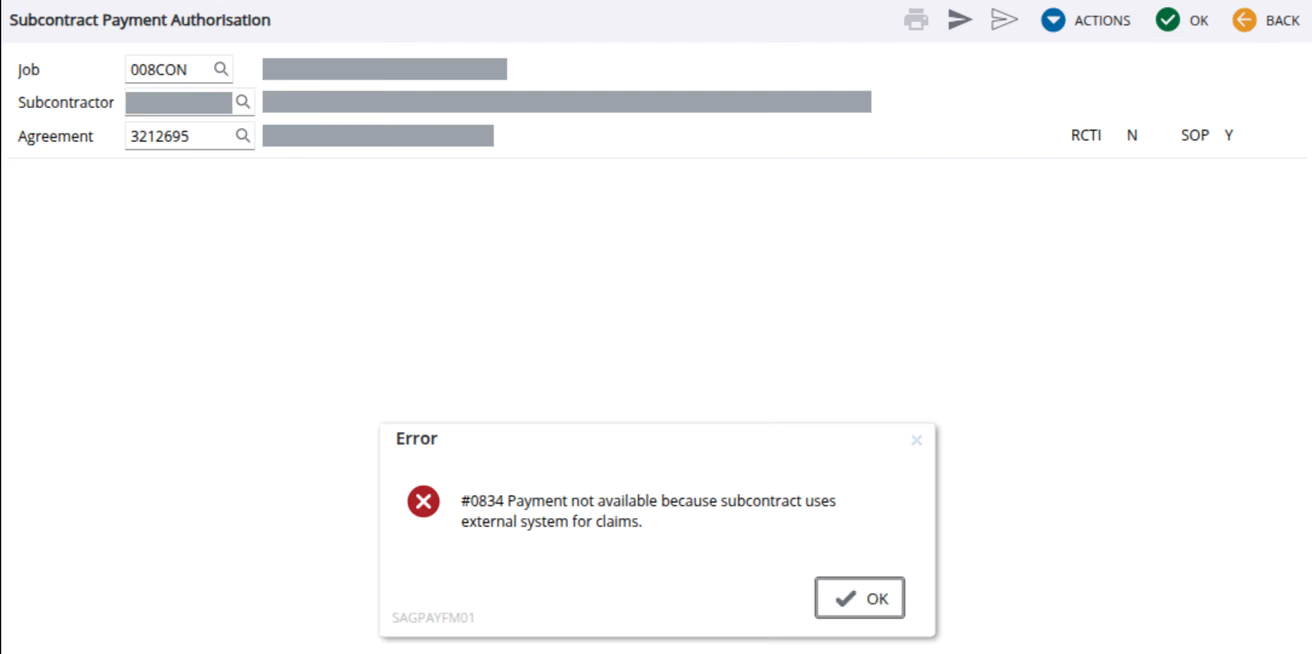
Removing the link in Teralo doesn't untick the box. To enter claims on the agreement in Jobpac again, a Jobpac administrator unticks Enable TERALO in Maintain S/C Agreement.
When a claim's last approval lands, Teralo sends it to Jobpac. Learn more about progress claims.
- Cost contract: a subcontract claim on the contract's agreement, numbered PC and the claim number, such as PC2. If Jobpac already holds that number on the agreement, Teralo adds a letter: PC2B. The claim carries the retention held, and its lines are grouped by tax code.
- Revenue contract: an AR invoice to the organisation's debtor on the project's Job, numbered with the Job and the claim number, such as 008CON-2. Its lines are net of retention, on the Default Revenue Account.
The claim's Accounting card shows the result:
- Posted to Jobpac: Jobpac took the claim. The card shows its number and the date.
- Export failed: Jobpac refused it, and the card shows why. Fix the cause, then select Retry export.
- Not yet exported: something was missing at approval. Fix it, then select Push to Jobpac.
- Skipped: there was nothing to send.
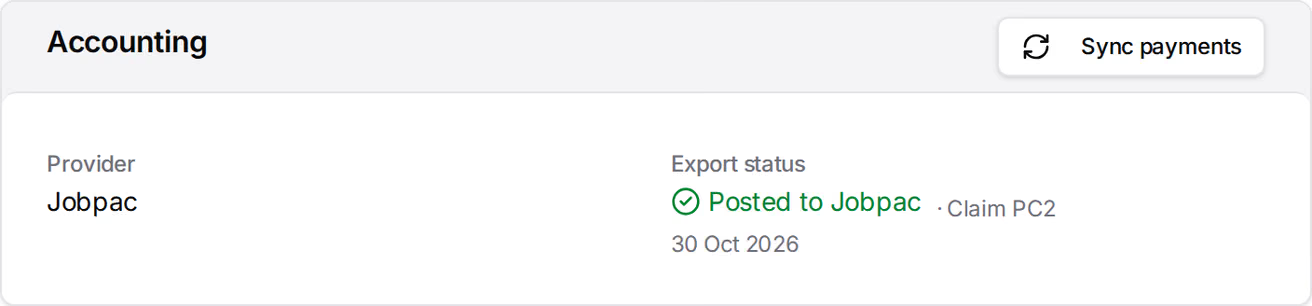
Before sending, Teralo checks the claim against your setup, and in Jobpac. When a check fails, Teralo shows the first reason, with Fix where it can open the setting:
- "The contract is not mapped to a Jobpac subcontract Order": link the contract to its agreement.
- "The contracted organisation is not linked to a Jobpac creditor" (or debtor): link it on the Organisations tab.
- "Tax rate ... is not mapped to a Jobpac tax code": map it on the Tax Rates tab.
- "Job ... is not set up for Teralo claims in Jobpac": tick Enable TERALO on the Job.
- "Agreement ... already has claims in Jobpac": a Jobpac administrator decides whether to tick Enable TERALO on the agreement.
- "The project is not mapped to a Jobpac Job" (revenue claims): link the project on the Jobs & Orders tab.
- "No default revenue account configured" (revenue claims): set it on the Revenue tab.
An approved direct cost goes to Jobpac as a pending invoice to the creditor in its Accounting vendor, one for each GL account and tax code on the cost. Your accounts team checks and posts it in Jobpac.
- It needs a Default Expense Account. If you entered the Invoice total (inc tax), the lines must add up to it.
- Teralo numbers each pending invoice DC and seven characters of the cost's id, adding a letter to the second and later ones. The export status names them.
- To send it straight away, select Push now.

Teralo can't remove a pending invoice from Jobpac. To change a cost after it's sent, remove the pending invoice in Jobpac, or credit it if it's posted. An organisation administrator then selects Force Unlock on the cost.
When a variation's approval workflow approves it, Teralo sends it to the project's Job. Variations go to Jobpac only, never to Xero or QuickBooks.
The variation's Jobpac card shows Exported as with the Jobpac variation number and Job. If it shows Export failed, fix the cause, then select Retry export. To send an approved variation that hasn't gone yet, select Push to Jobpac.
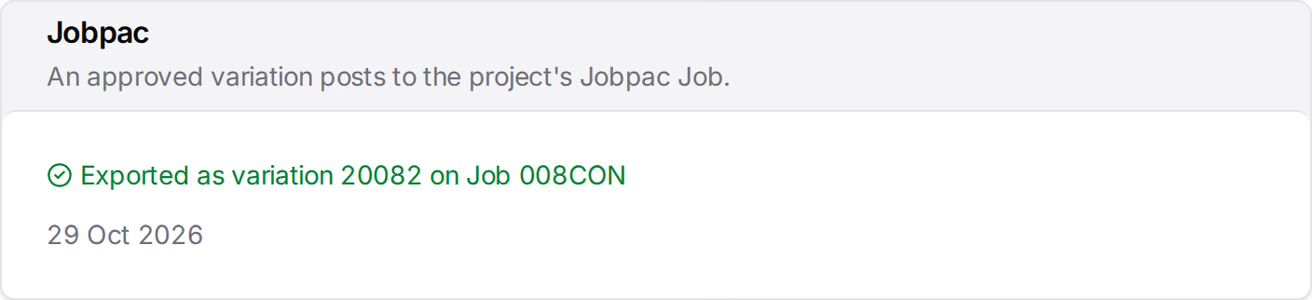
Teralo reads payments from Jobpac when you select Sync payments on a claim or direct cost, and when someone at the host organisation opens an exported, unpaid claim or direct cost (at most once every 10 minutes). It doesn't check Jobpac in the background. A payment read from Jobpac shows the source Jobpac.
A subcontract claim shows as paid once Jobpac has processed it and paid it.
- Open the claim and select Return to draft.
- In Reopen exported claim?, select Void & reopen.
- Revenue contract: Teralo reverses the AR invoice with a credit note under the same number, then reopens the claim. If Jobpac shows a payment on the invoice, Teralo refuses: reverse the payment in Jobpac first.
- Cost contract: Teralo can't reverse a subcontract claim in Jobpac, and refuses. Reverse it in Jobpac, then select Force unlock & reopen anyway.
Warning: Disconnecting deletes every organisation's creditor and debtor link. After you reconnect, link each organisation again.
- On the Accounting page, select Disconnect.
- Select Disconnect again to confirm.
The Job isn't ticked Enable TERALO, or the agreement isn't. Jobpac refuses a claim from Teralo with "Creditor ... is not active" in both cases, even when the creditor is active. Tick the box, then select Retry export.
The agreement has Enable TERALO ticked, so its claims come from Teralo. Jobpac answers "#0834 Payment not available because subcontract uses external system for claims".
Jobpac sets up every API user that way, and the API still works. Ask Jobpac support for any change to it.